Research
Digital & non-digital materials, techniques & processes in art & design.
Non-Digital/ 2D
Mono Printing- Is a form of printmaking that has imagery or lines that can only be made once. This is the complete opposite most printmaking where there are multiple originals. There are many different techniques of mono printing, examples of standard printmaking techniques which can be used to make monoprints include lithography, woodcut, & etching.


Painting- Is the practice of applying paint, colour, pigment or any other type of material to a solid surface. It is commonly applied to the surface with a brush, but other materials such as knives, sponges & airbrushes. Painting is a mode of creative expression & there are many different forms such as: Abstract art, oil painting, water colour, charcoal etc.


Manipulation
Manipulation involves transforming or altering an image using a range of different methods & techniques in order to achieve the desired result.


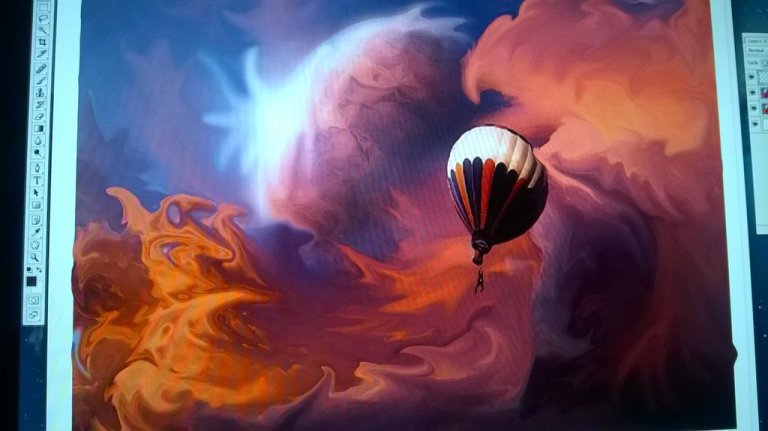
Here below is one of my own photo manipulation I did with a peer. In this image it is supposed to show a cloud with anthropomorphic qualities trying to grab a balloon. I have emphasised the cloud trying to eat the balloon by giving the cloud a mouth & a hand.
Mixed Media art

")


Flower Image: http://papercollageart.blogspot.co.uk/2010_08_01_archive.html
Mixed media is generally a work of visual art that combines a range of distinct visual art. For example, a work on canvas that combines paint, ink & collage is generally referred to the definition of a mixed media artwork because it does not contain any multimedia qualities like audio.
https://en.wikipedia.org/wiki/Mixed_media
Thumbnail Sketching


Thumbnails are quick sketches & abbreviated drawings. These drawings are usually done very rapidly with no corrections & thumbnails sketches are usually very small, often only an inch or two high.These sketches serve as a memory to help you remember important features of a subject or when making notes for a painting or drawing, also artists often use thumbnail sketches to plan pictures.
Time-based processes
Story Boarding


A storyboard is a series of images displayed in sequence for the purpose of visualising a motion picture, animation or interactive media sequence. The storyboarding process was developed at Walt Disney Productions during the early 1930s, after several years of similar processes being in use at Walt Disney & other animation studios.
Time lapse
Time-lapse is a technique where the frequency at which the frame rates is much lower than what is used to view the sequence. When played at normal speed, time appears to be moving faster, which is lapsing. For example, an image of a scene may be captured once every second, then played back at 30 frames per second; the result is an apparent 30 times speed increase.
https://en.wikipedia.org/wiki/Time-lapse_photography
Animation


Animation is a simulation of movement created with a series of pictures or frames. Animation can be recorded in a multiple of different ways such as, a flip book, a motion picture, digital media, which also includes formats with animated GIFs, Flash animation etc. To display animation, a camera, computer is used to project these animations.Animation creation methods include the traditional animation method & stop motion animation of two and three dimensional objects & other methods. Images are displayed in a rapid fashion which is usually 24, 25, 30, or 60 frames per second.
https://en.wikipedia.org/wiki/Animation
3D Processes
Model Making

Model building is known as a hobby that involves the creation of models from either from kits or from materials and components acquired by the builder.
Armatures


In sculpture, an armature is a framework around which the sculpture is built. This framework provides structure and stability, especially when a plastic material such as wax is being used as the medium. When sculpting the human figure, the armature is analogous to the major skeleton & has essentially the same purpose: to hold the body erect.
These are often made of heavy, dark aluminium wire which is stiff, but can be bent and twisted into shape without too much trouble. The wire is affixed to a base which is usually made of wood. The artist then begins fleshing out the sculpture by adding the wax over the wire. Depending on the material & technique, the armature may be left buried within the sculpture but, if the sculpture is to be hollowed out for firing, it must be removed.
This process is heavily used by a majority of animation studios in order to get the bases of what they want their characters & other elements of the film to look like. The animation studio that uses this the most is Aardman that uses this process for their movies such as: Wallace & Gromit, Chicken Run, Flushed Away etc.
https://en.wikipedia.org/wiki/Armature_(sculpture)
Youtube Channel Research
Robert Marzullo
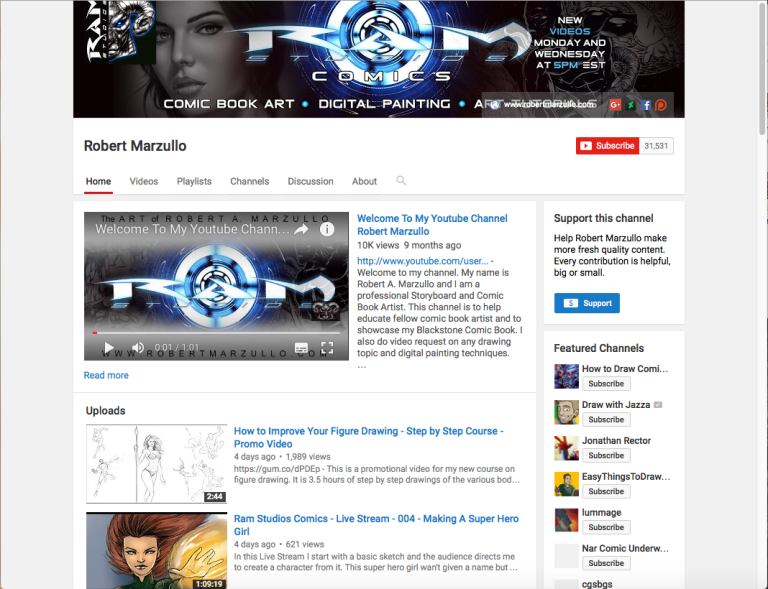
https://www.youtube.com/user/MrRamstudios1/videos
Robert Marzullio does a lot of how to draw videos on the subject of comic book illustration & traditional drawing techniques. Robert also does tutorials on digital painting with Photoshop & Manga Studio. This channel is a great example of what this brief hopes for me to achieve because Robert wants to show off his knowledge so that he can help other artist gain his knowledge in order to grow their artistic abilities. This channel gives me a deeper understanding of what I need to put on my own channel to replicate the formula that Robert has used here.
Koziu
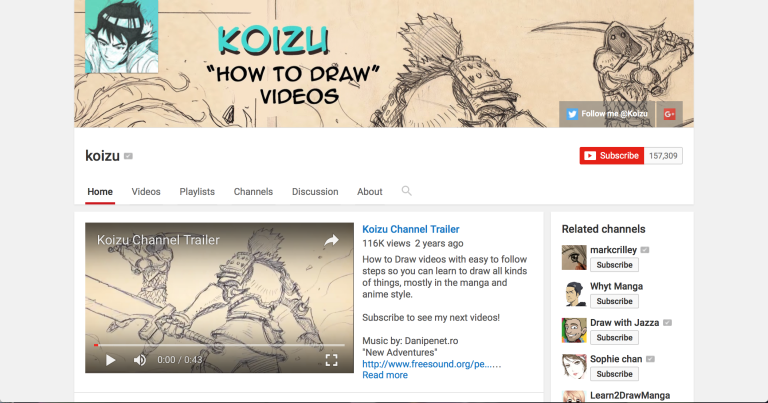
https://www.youtube.com/channel/UC0WfxkE12_UFucF6NU28A9A
Koizu is also a channel where he does a series of videos that teach you how to do a range of techniques, like for example: action fight scenes, motion, proportions etc. I believe that this is another great example that follows along the lines of the brief because Koizu is sharing his knowledge of techniques with his viewers in order to help them develop their own.
Draw With Jazza
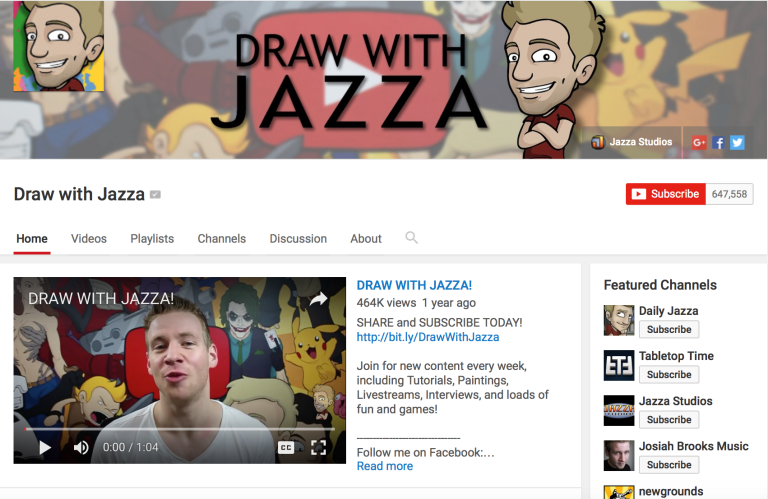
https://www.youtube.com/user/DrawWithJazza
Drawing with Jazza’s is another great example of a channel that teaches others a range of techniques & processes. The good thing about Jazza is that all of his tutorials are very clear to understand & the processes that he carries out are taken at a slow place so that the viewer does not get confused. This makes me realise what I have to do for my own channel because if I follow the same formula that this channel has taken, I will have a greater effect in attracting viewers to gain help from my own tutorials. Jazza’s style is also much different from the other two because instead of comic art or manga, Jazza has gone for a cartoonish route which is good because by having a colourful cartoonish style it will attract a viewers eye more effectively than one that is plain & boring.
Proposal
Section 1
Working Title: Birdie’s Creative Arts
What you will work towards producing?
In this unit I will work towards producing graphics which can be used to create a video channel on youtube. I will need to to showcase a range of experiments with Materials, Techniques & Processes through screen casting & producing short video how to s. I will also need a way to effectively brand my youtube channel so that I have a better chance with future employers.
Section 2
Influences, starting points and contextual references:
For my youtube channel content I am going to use Robert Marzullo’s art channel as a starting point for my own channel because by going through his videos, I have found that he also experiments in a range of digital & traditional techniques & he is also a comic artist for a company which means he sharing his knowledge to others about how to accomplish work like his. I believe that this will be a great template for me to work off because I will gain a deeper understanding on how to do my own channel.
Early ideas research & sources
My early ideas for my channel will be based on content from already existing art techniques youtube channels that may include content of techniques that I would like to use in my own youtube channel.
Section 3
Intended techniques, non digital & digital processes
My intended techniques that I am to do for my youtube channel will hopefully be a mix of digital & non digital processes so that my channel will have a range of different techniques & processes within my channel.
Section 4
Proposed methods of evaluation
I will use my own work for the evaluation, starting from the research to the final outcome that will be on my blog. I will also evaluate my process through my videos & techniques in order to ensure that I have followed the brief to an extent.
Ideas Generation
Youtube Icon
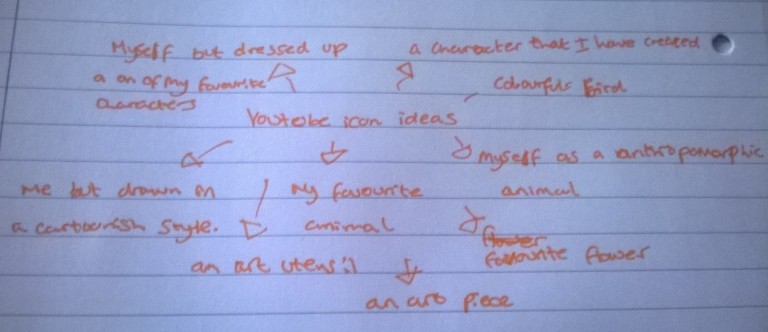
Here is a mind map of some of my ideas for what I could do for my youtube icon. For my icon, I would like to do something that relates to the theme of art as well as the icon being one of my personal favourite things because I want my channel to be unique & simple so that it will make my channel stand out beyond others because of the style that I use.
Channel Art
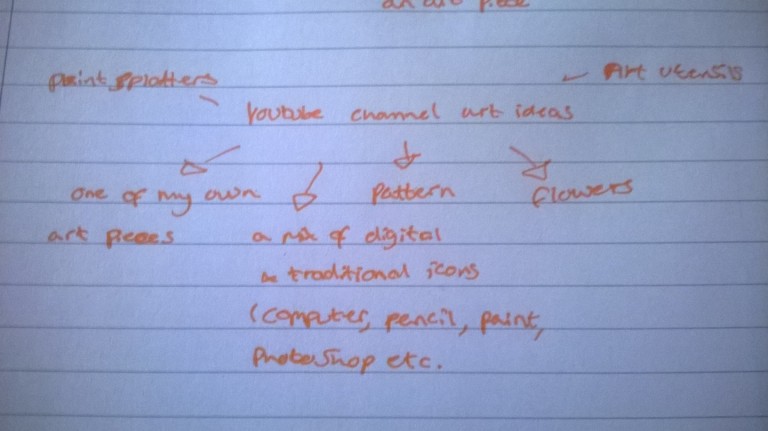
Here is a mind map of my ideas for my channel art. For my channel art, I would like to use something that would instantly show what my channel is about without having to explain it. I would also like to use something that would attract a youtube users’ attention, which I think should be colourful & eye catching because I believe by having something along these lines will interest viewers to look at my channel.
Content
For the content for my channel, I will like it to have a range of different techniques & processes so that I can show my viewers what I am capable of & so that I can follow what the brief is asking for. For my content I will am to have the following;
Animation
How to videos
Character Processes
Thumbnail Sketching
Storyboarding
Perspective
Creating Characters Process
Ideas Development
Youtube icon


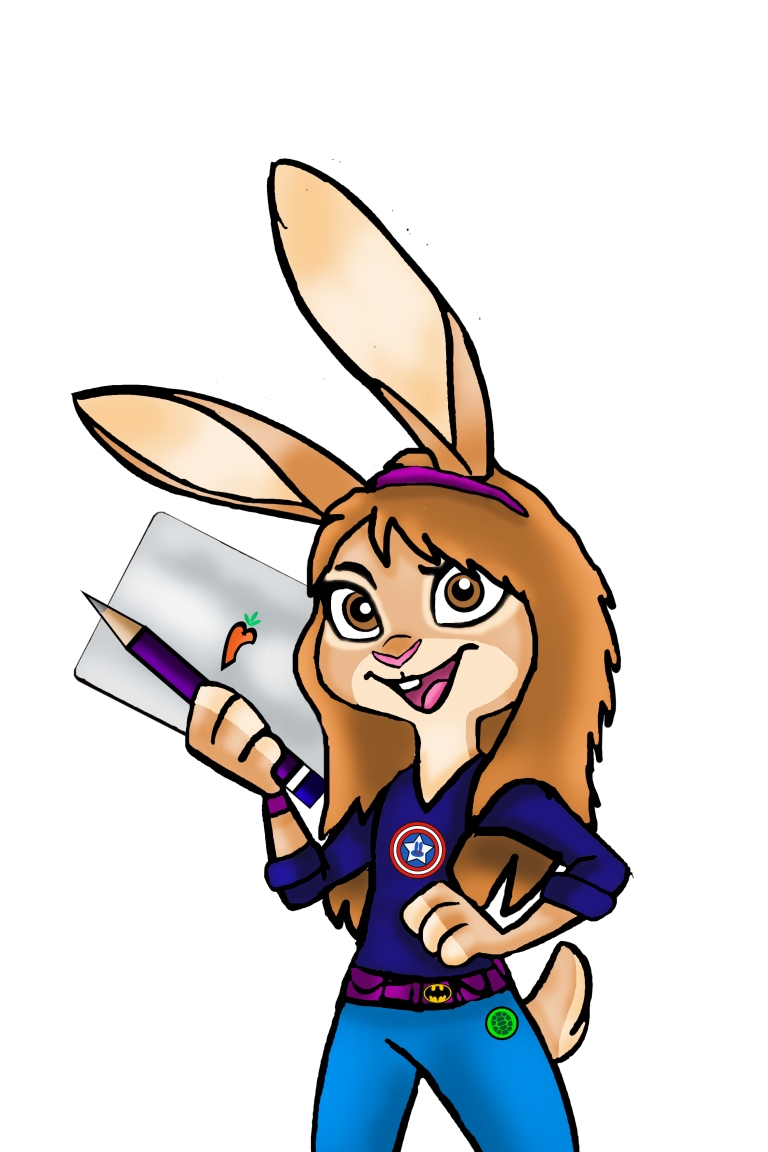
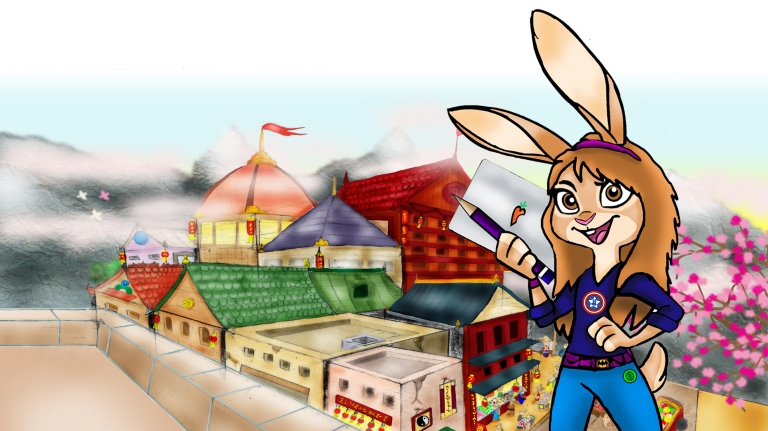
This is the image that I have decided to use for my icon for my youtube channel. The reason why I chose to do this as my icon because I did not want to use an image of myself, so instead I used something that I felt comfortable with, like for example I used a rabbit because they are one of my favourite animals & I altered the rabbit’s appearance so that she would look a bit like me, I also used icons from some of my favourite shows/heroes & finally because it is a channel about art techniques, I decided to include the character with a laptop to represent digital art & a pencil to represent traditional art to show what type of techniques the channel will involve.
Channel Art
This is the channel art that I am going to use for my youtube channel. The channel art that I have decided to use for the channel is actually my own piece of artwork that I drew & photoshopped myself. The reason why I used this is because this channel is a portfolio channel so I thought the best way to showcase my channel by putting one of my favourite art pieces on the cover.
Content
Channel Trailer
Thumbnail Sketching


In this video, I am showing the process of sketching out multiple frames in order to tell a story for a possible animation. I believe that this technique will help the audience to gain a deeper understanding on how to start planning a story or animation for practice.
Reflection
I think that even though it shows the process of thumbnail sketching, I think that I should of had something better to record my process because at some points there is some blur which may cause the viewer to become agitated with it because they cannot see what I am doing. However this recorder was the only thing that I had to record & I had no stand & no one to help me record it so I did my best with what I had. Another reflection about this is that I could not record any voice over for this one because I could not sync it up properly however, the reason for that was because all of the videos were in separate parts so it was quite hard to determine when to say what. Next time I think I should put the whole video in one to make sure there is no implications.
Animation
Constructing the frames


Constructing each frame for the animation was quite difficult because I had to figure out when each action is taken because the process that I wanted my character to go through is a fight scene with an enemy & in order to make that work, I had to make a series of images depicting a specific action to get a fluent animation, like for example when the girl goes to kick the enemy you need to make sure the kick runs smoothly & in order to do that you have to start with the build up & work into the kick because other wise the girl’s movement will be stiff & unrealistic.
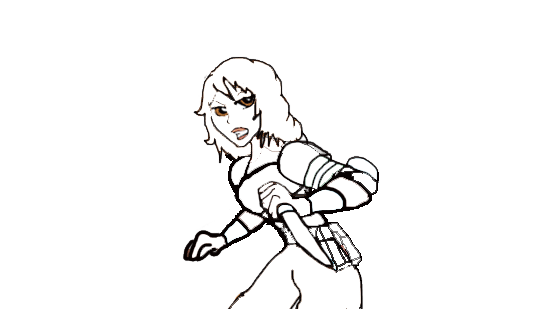
Another thing that I had to figure out when doing this process was the expressions because I needed to pin point how exactly the girl would react to a specific situation ,like for example when the girl encounters the enemy does she either act surprised or is she fully prepared or when she takes out an enemy is she determined & fearless or is she scared & clumsy.


The next thing that I had to figure out in the animation was how the girl’s armour would work during movement because I needed to find a way for the armour to be there without constricting the character’s movement. For this I looked into medieval armour which features a lot of different things to work with, so I then decided to change the girl’s armour to make it lighter for her to be able to move more fluently.
Here is before & after.


How to create a watercolour effect in photoshop
When I was trying to find techniques that I could use that would be beneficial, I found an image that had what was called the water colour effect as seen below:
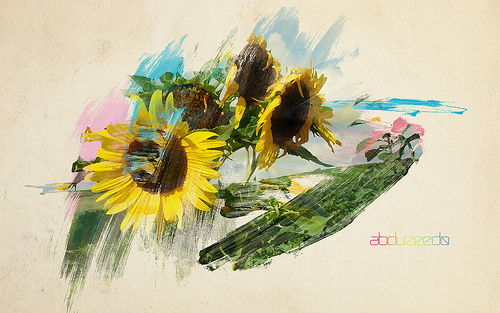
https://www.flickr.com/photos/azeected/with/3649696199/
After seeing this image, I wanted to try it out for myself so I looked this technique up & found many different ways you could achieve the outcome that I wanted. I was thinking that I would make a similar adaptation of this tutorial in my own way so that I could share my own version of the knowledge that I had gained, for example:
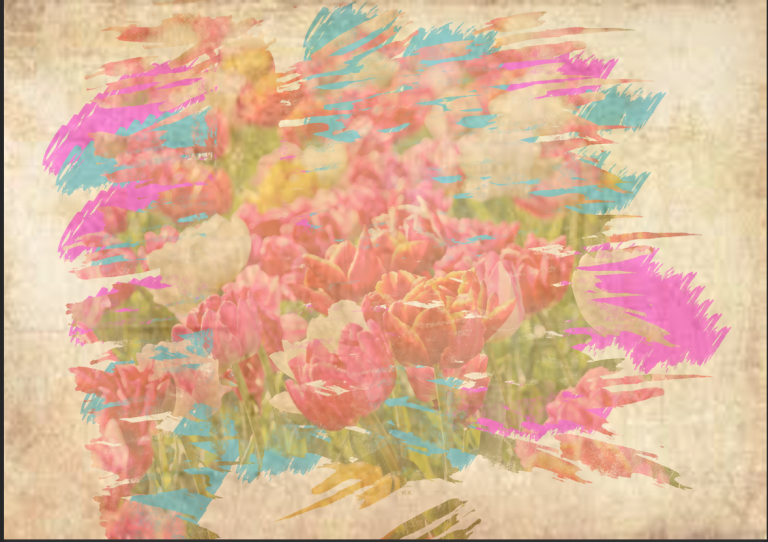
The next thing I made sure I did was to do some practices before I made the video because I want to make sure I don’t stumble & freeze while doing the video because it wouldn’t be very beneficial for the viewers.
Here are some tests I made:


In order to achieve the outcome that I wanted, I needed to have a water colour brush set so the effect would work. After doing some research on the internet, I found a website that appealed to my needs which was, “http://www.brusheezy.com.” Thanks to this website I was able to create the effect that I wanted & was able to gain new knowledge on this technique.
Outcome
In this how to video, I am showing how to create a water colour effect in photoshop. Again, I have clearly shown & explained how to do this process effectively. I believe that this will be very beneficial because it can show others how to create a simple, cool effect that can be done with their images in just a few steps.
When I found out how to do this technique, I instantly knew that this would be a good technique to share my knowledge of because it would allow you to add a cool effect to an image of your choice. It is also a good way of simply explaining step by step to do the technique instead of looking up complicated solutions.
How to create leopard style spots in photoshop
I learned the technique of how to create leopard style spots in photoshop a couple of months ago when I was creating my leopard character.When I first tried to gain knowledge of this technique, I came across the tutorial below:
http://www.hongkiat.com/blog/photoshop-tutorial-design-tiger-leopard-style-character/
Now in this tutorial, it only applied to text instead of a character like I wanted, so in order to achieve the outcome I wanted I needed to change & adapt to my needs. So, in order to achieve the outcome I first skipped step 1 & 2 & went to step 3 where I could use the lasso tool to start creating the spots. After filling in the spots, I then went straight to step 7 because it was the next logical step as the ones before were to do with text. Finally, I then followed the rest of the tutorial accordingly & I got this below:


In this video, I have produced a how to video on how to create realistic leopard style spots in Photoshop. I think this can be very beneficial for the audience because I have slowly & very clearly explained step by step the process of creating spots.
Process: Digital
Photoshop
Produce Outcome
https://www.youtube.com/channel/UCdSrUO55XZdgFenq20s3UgQ
Final Evaluation
What was the task that was presented?
The task for this unit was to create a youtube channel. The channel was to act as a base for an online portfolio which meant that we were supposed to design a brand for ourself and showcase a range of experiments with Materials, Techniques and Processes through screen casting & producing short video how to . The purpose of this channel is to show how we work & to share knowledge we have gained to help others & build an audience for our work which could lead to freelance opportunities & potential long term employment.
What were your original intentions for your Youtube Channel?
The original intentions that I had for my youtube channel was to showcase & share my knowledge of the processes & techniques that I use in order to achieve my final outcomes. Another intention that I have for my channel is to give others a more simple way to achieve outcomes that they would want because from my experience whenever I look up tutorials online, they are either too long, complicated, don’t work, don’t give you the outcome you wanted etc.
How does your finished channel outcome compare?
I think that the outcome of my channel is similar to my original intentions because I have made my tutorials simpler & easier to understand so that all viewers will be able to get the outcome that they would want. Also, I think that it will help others gain an understanding how to do different techniques.
What went well?
The thing that went well in this unit for me in this unit is that I was able to put my skills to use so that I could share it with others on my channel. Another thing that went well for me is that I could put work in progresses of my work on the channel like the animation, so that I can show it as it goes from a 3 second clip to a full fledged action clip.
What could you improve?
The thing that I could improve is that I could of done more for this unit, but the process that I was developing took a lot longer than expected, like for example the animation took me a few weeks to actually get that one scene.
